![Sew Cute To Cuddle [Book Review]](http://thisblogisnotforyou.com/wp-content/uploads/2014/10/IMG_0823-133x200.jpg "IMG_0823")
Hello there!
These pictures make me feels like autumn is already around the corner! But it’s actually really hot and summery here at the moment. I took these pics two weeks ago when the weather was quite cool and windy after we had a week of rainy days. Right now there’s nothing that could make me wear anything long-sleeved!
Let’s talk about the pattern!
The pattern is the ANIKA DRESS by ZIERSTOFF. Zierstoff is a German indie pattern company who recently started offering some of their favourite patterns in English. They have some really awesome women and kids wear patterns, you should really check them out if you don’t know them yet.The Anika dress is a really easy and quick to sew pattern that comes in two versions: you can either make it with a collar or a hood. Both collar and hood cross over at the front which looks really cool if you ask me.
I decided to make the hooded version, because, you know, if you can make it with a hood, make it with a hood!
In terms of sizing, the pattern runs slightly on the larger side. I cut the pattern without making prior changes and the fit was pretty much ok. As I said, it’s slightly large at the sleeves and waist, but that’s how it looks on the envelope as well. Obviously if you wanted it to be more fitted, you could simply take it in a bit.
I love that it’s not too tight. I have a lot of tight knit dresses and I’ve found that I prefer baggier, comfy clothes during the colder seasons.
This will definitely become a wardrobe staple for my autumn sewing!The fabric is a gorgeous teal one-way stretch knit fabric, courtesy of Zierstoff. The lovely ladies over at Zierstoff headquarters offered to send me some of their fabric so I was able to make the exact same dress as the one in the sample pictures.
This is by far one of the more comfy dresses I’ve made and I love wearing it. It’s the perfect dress to wear at home. The version with the wide collar would also make a really nice comfy dress for the office.
Are you already planning your autumn wardrobe or are you still caught up sewing summer clothes?
xx
Charlie
Happy sewing!
♥
facebook/bloglovin/pinterest
twitter/instagram
Stay in touch!
HELLO AUTUMN
It was the first day of autumn this week and although I wish for summer to last just a little bit longer, the colder season has undeniably arrived. I found myself wearing woollen socks, comfy cardigans and sipping hot chocolate on the sofa the last couple of days. With the beginning of autumn the weather changed here in Germany. The air is crisper and the mornings are really foggy now. So I try my best to adapt to the changing seasons and find some joy in thinking up my autumn/winter wardrobe and digging out some of my warmer handmade clothes.
I finished my first knitting project last weekend! It was a super easy and simple project to dive back into my knitting, which is a hobby I only keep up during the colder seasons.
The lovely folks over at WOOL AND THE GANG sent me some of their very popular Billie Jean Yarn, which is now back in stock. They’re giving away two balls of Billie Jean Yarn for one of you lucky ones and I’ll share the knitting instructions in case you want to make a hat like mine. (All opinions are my own. Giveaway at the end of the post!)
Those of you following my blog know that I’m a big fan of recyling and upcycling, well, generally using secondhand products to create unique things while being a friend to nature. The Billie Jean Yarn is made using upcycled pre-consumer denim waste. This waste is ground back into fibre and then woven into beautiful yarn. The process does not make use of chemicals and dyes and therefore is super eco-friendly. That’s pretty amazing, right?
But not only that, just look at how preeeeetty it is:
photo credit: Wool And The Gang
photo credit: Wool And The Gang
Well, long story short – I’m very much in love with Billie Jean! I chose the “Dirty Denim” which is one of three different colour options on offer. The Dirty Denim is 60% Upcycled Denim and 40% Upcycled Raw Cotton and super soft on the skin. No fear – it does not smell like jeans at all!
It gives your knitting project a unique look with its edgy and effortless cool look. For a hat or cardi it’s perfect to wear with actual jeans or a white shirt. The Dirty Denim really gives the effect of a lot of texture, so I didn’t use a special pattern – it would’ve been hard to see. I knitted with metallic knitting needles as the yarn is easily separable which was a bit tricky with my bamboo needles.
Now onto making your own cosy & warm Billie Jean hat!
KNITTING INSTRUCTIONS
You’ll need two balls of Billie Jean Yarn. I used roughly 150-180g to finish my beanie including the pompom. So two balls á 100g should be enough even for larger sizes. The recommended needle size is US 8 / 5mm, but I found that smaller needles worked better for me. So I’ll stick with that in the instructions.
Size:
54cm head circumference. Adapt to your size and tension if necessary.
Beanie Pattern:
With 3.5mm cast on 80 sts.
Row 1 (right side): K1, *p1, k1, repeat from* to last stitch. So you’re basically just alternating between a knit and a purl stitch.
Now work in rows (knit the knits and purl the purls), repating row 1 another 29 times. (Or less if you want the brim to be narrower!)
Change to 4.5mm needles.
Row 31 – 75: Knit all stitches. Keep working in rows in a simple stockinette stitch for another 45 rows.
Row 76: *k2tog, repeat from* to last stitch (40sts).
Row 77-78: Knit all stitches.
Row 79: *k2tog, repeat from* to last stitch (20sts).
Row 80: Row 77-78: Knit all stitches.
Row 81: *k2tog, repeat from* to last stitch (10sts).
Cut yarn, leaving a long tail, and thread tail through remaining 10 stitches.
Pompom:
Cut two cardboard circles, 11cm in diameter. (Cardboard from a pizza box will do!)
Cut a 4 cm hole in the centre of each to create two rings.
Hold the two rings together and wind yarn evenly through the centre hole and around the edge until the centre hole is full with the wraps. Slip the blade of your scissors between the two pieces of cardboard and carefully snip through all the loops of the wound yarn. I used to IKEA cork coasters hold it up with one hand while cutting with the other. It makes it a bit easier.
Thread a long length of yarn between the two card rings and around the centre of the pompom, then tie tightly in a firm knot to secure. Remove the cardboard and fluff up the pompom. You can then trim the pompom with scissors, if necessaryto get a more even shape.
Use a darning needle to sew the pompom onto your beanie and to hide any loose threads.
And you’re done!
To have a chance at winning two balls of Billie Jean Yarn in your colour of choice, just head over to Woolandthegang.com, check out the color options and leave a comment below, letting me know which one you like best!
The giveaway closes on Friday 7 October 2016 at midnight (UTC) and I’ll annouce the winner shortly after on the blog.
GOOD LUCK!
xx
Charlie
Please note: A winner will be selected at random from all entries entered before midnight on 7 October 2016 and the winner will receive the prize described above. There is no cash alternative, and your prize is non-negotiable, and not refundable. If the prize isn’t claimed, another winner will be selected at random.
Happy knitting!
♥
facebook/bloglovin/pinterest
twitter/instagram
Stay in touch!
Today I’m sharing two pretty amazing projects with you. One is an oversized coat I made last Winter and didn’t get around to blog until now and the other one is hot off the sewing machine: my first pair of skinny jeans!
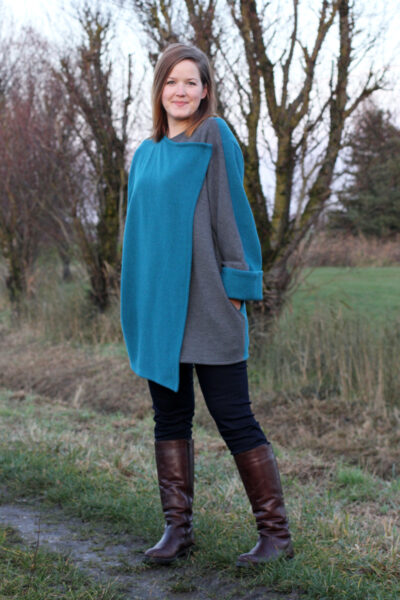
Coat pattern: Let’s have a look at the coat first. For this cosy wool coat I used Burdastyle pattern 09/2015 #117A. View B is belted and slightly shorter than View A. The pattern is pretty brilliant as long as you use the right fabric. They’re asking for double-sided wool because it comes without lining. Therefore, it’s a really quick, simple sew. No interfacing, no lining, no bindings. It’s pretty much just three pattern pieces: front, back and back sleeve (plus pockets). The sleeves are two pieces. The front one is cut as a kimono sleeve and part of the front bodice pattern.
Fabric & construction: I found this amazing double-sided wool fabric at stoffkontor.eu for a very good price. Unfortunately, they’ve run out of it since. It’s a lovely teal boiled wool on one side and a grey sweater knit on the other side. The pattern really requires a fabric with “two good sides”, so this one was perfect.
You might wonder about the contrast detail I did in the front. Well, this wasn’t planned I have to admit. I made a mistake I haven’t made in a long time: I forgot to mirror the front pieces. To my defense, I had to cut the coat with the fabric laid flat in one layer, because the pattern pieces are huge. I simply forgot to flip over the front pattern piece before cutting it out a second time. As I did not have enough fabric and couldn’t be bothered to order more, I decided to run with it.
Looking at it now, I think it looks pretty neat. The Mr thinks it’s the best feature of the coat, and he’s kind of right. Still, I sometimes catch myself thinking of it as a mistake, because I know it wasn’t planned.
The construction is very easy. So this is a great project for anyone who doesn’t feel ready yet to tackle a proper coat. As for finishing the raw edges, you simply fold over the edges and stitch them in place. So the only tricky bit is getting the mitred corners right and neat.
The coat closes as a wrap with two snap fastenings at the top.
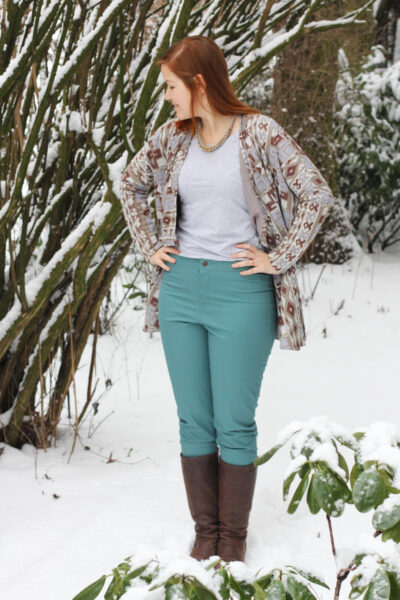
Skinny jeans pattern & construction: Let’s talk about my first pair of Mia Jeans! When SEW OVER IT published their Capsule Wardrobe pattern ebook, I couldn’t wait to try the skinny jeans pattern. I love a good high-waisted, simple pair of trousers and I love skinny jeans.
I was a bit concerned that getting the fit right might be a bit of a struggle. Luckily I had some really stretchy denim fabric in my stash which I could use as a muslin. Turned out I didn’t really need a muslin, as the fit was great and I only had to make minor adjustments. The pattern comes with an extra wide seam allowance at the side seam which makes fitting very easy.
Sewing the pockets was so much fun. Next to sewing the front fly, getting the pockets right is probably taking longest. I basted them on by hand before stitching to get them perfect.
I had a lot of fun trying out decorative stitching with my new sewing machine. I did not use contrasting thread for all seams, just for the pockets. It’s a very minimalist pattern, so the pockets really are the eye-catcher.
Although I’ve sewn quite a few front flies before, I struggled a bit with this one. I accidentally sewed the front shut and overlocked the seam before realising I was missing the front fly. Stupid, I know. I had to cut off quite a bit of the seam allowance to remove the overlocked edge and there wasn’t much left to play around with. Which made constructing the front fly a bit difficult. That’s why the zip is showing a bit, which is somewhat annoying.
Lisa of SEW OVER IT made a wonderful video tutorial on sewing the front fly, which you can find on her youtube channel. There are photographed instructions in the ebook, but if you’ve never tackled a front fly before, I really recommend watching the video tutorial.
(Very casually sucking in that tummy and hiding the showing zip)
Both jeans and coat are amazingly comfy and therefore my new work uniform. I got a lot of compliments for the coat. Nobody mentioned the jeans, which, I think, means they don’t look handmade and that is a good thing. I made a pair of skinny jeans that looks store-bought, ha!
Will I be making more? I definitely won’t make the coat again, as you do not need an indefinite amount of coats, and I am planning on making a properly lined and interfaced one this winter. But I will be making tons of Mia Jeans! In fact, I have already made another pair and bought fabric for at least three more! It’s definitely my go-to jeans pattern now and plain enough to use as a base for some great pattern hacks.
What’s your favourite pattern at the moment?
xx
Charlie
Happy sewing!
♥
facebook/bloglovin/pinterest
twitter/instagram
Stay in touch!
WOOL AND THE GANG sent me some of their Shiny Happy Cotton Yarn to try their Ruby Rabbit Toy kit just in time for the Easter holidays. I’ve never crocheted before, so this was a first for me! I love new challenges and quick DIYs, so this was a perfect after-work project. (All opinions are my own. You can enter the giveaway at the end of the post.)
It took me two evenings in total and I was surprised how successful my first dabble at crocheting was! I made the white bunny first. If you look closely, you can see it’s a bit larger than the mint green one and somewhat wonky – but all in all, I’m really pleased with how it turned out.
I chose the spearmint green Shiny Happy Cotton, as I love pastel colours in my home. The wool is lovely and soft to touch, and has a silky shine to it. It’s perfect for those amigurumi-type projects, as it’s absolutely lint-free. I always wanted to try amigurumi crochet toys, but thought it was super difficult. After finishing two perfectly cute bunnies with no prior experience whatsoever, I might actually attempt this some time soon!
The kit is rated ‘intermediate level’. The instructions include illustrated basic crochet techniques, which was really helpful. The only thing I had to look up was the magic loop technique. I do have quite a bit of experience with knitting, so learning to crochet wasn’t too difficult. But in my opinion, even an absolute knitting and crocheting beginner could tackle this.
The only thing I struggled with at first was tension, which is why my bunnies are different sizes.
The kit includes one ball of Shiny Happy Cotton (colour of choice), the ruby rabbit pattern, a yarn sewing needle and a WATG label. Optionally, you can order the required 4.5mm crochet hook with it and a different colour yarn for the eyes. I used less than one ball of yarn for each rabbit, and had more than enough left to use for the eyes and nose. So if you order two balls, you get two rabbits out in the end. You’ll need some toy stuffing or yarn/fabric scraps to stuff the rabbit. I used stuffing from an old pillow.
photo credit: Wool And The Gang
photo credit: Wool And The Gang
To have a chance at winning a Ruby Rabbit kit in your colour of choice, just head over to Woolandthegang.com to check out the color options. Leave a comment below, letting me know which one you like best and head over here to sign up to the WATG newsletter!
The giveaway closes on Tuesday 18 April 2017 at midnight (UTC) and I’ll annouce the winner shortly after on the blog.
Also, you can use the promo code “EASTERX” to get 15% off until next Tuesday!
GOOD LUCK & HAPPY EASTER!
xx
Charlie
Please note: A winner will be selected at random from all entries entered before midnight on 18 April 2017 and the winner will receive the prize described above. There is no cash alternative, and your prize is non-negotiable, and not refundable. If the prize isn’t claimed, another winner will be selected at random.
Happy Easter!
♥
facebook/bloglovin/pinterest
twitter/instagram
Stay in touch!
Hi everyone!
A few weeks ago, I got to try out the new SEW OVER IT online class ‘Intro to Sewing with Knit Fabrics’. (As always, all opinions are my own!) I’ve never really made use of online courses before. I bought a couple on Craftsy ages ago but never actually made anything from it.
When the lovely ladies over at SEW OVER IT approached me, I immediately wanted to try after getting a glimpse at the patterns included in the class. I love their work and most of my favourite patterns are from SEW OVER IT. The Alice Top, with a faux bow front, was incredibly tempting! (There’s another pattern included, the Emma dress, which looks lovely, but I haven’t tried it yet.)
About the class:
It was pure joy to follow this online course. It’s always great to see lovely Lisa in action and she perfectly explains all the steps involved in making this cute top. The construction is not too tricky, but a bit unconventional and seeing it being put together on camera helps a lot. There’s a lot of useful information about sewing with knits included. As a more experienced sewer, I really enjoyed this class, none-the-less. It’s delightfully relaxing, as you really get immersed in the project.
My first Alice Top:
I used a green lightweight jersey, as was recommended in the class. (The fabric was gifted to me by my mother-in-law, so I’m afraid I cannot tell you where to buy it!)
For this first version of the Alice Top I went through the class step-by-step, pretty much cutting a straight size 10 without making any fit adjustments. It turned out really well! There were a couple of minor fit issues, I could easily fix before cutting another version of this pattern:
(Remember, these have nothing to do with the pattern itself, but are specific to my body measurements and posture)
The only thing I adjusted on the green top was taking in the waist by approximately 2 cm on each side. I’ll show you the fitted version of this top in the next post!
But perfect fit or not, this trial round went really well, don’t you think? The top is perfectly wearable and I’m really happy with it.
A few words about the construction: The Alice Top is fully faced, front and back, to create a perfect, close-fitting V-neckline and stabilise the gathers at the front. With the very detailed video instructions, this rather unconventional pattern isn’t very hard to construct. Once I finished the first top, I hardly had to revisit the course to make the second one.
The construction takes a bit longer than the average jersey top, as you have to stabilise the neckline and sew a couple more seams because of the facing. But the finishes look incredibly neat and professional.
No overlocker needed!
For this first top, I only used my sewing machine. So if you do not have access to an overlocker, this is the perfect project for you. Because of the specific construction techniques used in this course, you’ll get very neat finishes without having to use any professional equipment.
This was also the first project Aslan very helpfully assisted with modelling. I didn’t realise he might be a bit too big to use as accessory until after seeing these photos! Man, he’s grown so much in the past two months!
As I don’t want to post too many sewing-unrelated pics on my blog’s social media accounts, Aslan now has got his very own…For those of you, who want to see more of this cute little face, you can FOLLOW ON INSTAGRAM to watch him grow up!
What are your thoughts about online classes? Are you a fan?
xx
Charlie
Happy sewing!
♥
facebook/bloglovin/pinterest
twitter/instagram
Stay in touch!
…or, as those of you eagerly awaiting the Game Of Thrones Season 7 start tonight know: Winter has come.
To be prepared, I’ve checked out some cool knitting books for you! And I teamed up with the lovely folks over at Sterling Publishing to giveaway a copy of each book! (As always – all opinions are my own! My reviews are completely honest and I only giveaway products that I genuinely love.)
Let’s have a look!
Sixth&Spring Books
First, there’s Knit Noro: Accessories 2. It’s a beautiful hardcover book full of easy, mostly quick to make accessory patterns: gloves, socks, hats, shawls, ponchos, and more. The patterns themselves are fairly simple but show off some really great techniques and colourways. Projects in this book are certainly achievable for beginners and still interesting enough for more advanced knitters.
What I love most about this book is the photography. The Noro yarns come in beautiful rich colours and the projects are styled in a really cool way. The whole book has a really fresh look about it and inspires to start planning your autumn projects right away! It would certainly make for a great present, as well.
The knitting instructions are very detailed and clear, all marked on a 1 to 4 stars skill level.
All thumbs up!
Don’t these projects look lush? I love these cabled boot toppers!
Sixth&Spring Books
The second book I checked out for you guys is definitely my favourite of the two: 60 Quick Knitted Toys.
If I was able to show you all 60 of these projects, I would have! It was super hard to narrow it down to just a few sneaky peeks. This book is full of amazing knitting projects to make for kids: stuffed animals, toys and even games, which I had no idea you could knit! (Such as fishing or ball games, Tic-Tac-Toe, baby blocks etc.)
The book includes super cute stuffed animal patterns and some really fun, unusual knitted toys, such as a tool set, building blocks, a guitar, a peace hippie van, baby rings, numerous hand puppets and a castle set complete with a dragon, king and queen. (Also great for some Game of Thrones reenactment!) It’s all just very adorable and flipping through the books the projects get better and better. The projects range from super easy to really complicated-looking, so there’s definitely something in there for everyone.
The only drawback to this book: There’s simply not enough time to make all of these! But have a look yourself:
Super cute, right?
I simply LOVE that adorable little dragon. Which brings me back to the topic… dadam dada dadam dada dadam, dada daaaaaaa… Are you watching the GoT season start tonight?
No, sorry, I got distracted there. I wanted to let you know how to get a chance at winning a copy!
First, this giveaway it open to US and Canada readers only!
I’m really sorry, if this means you cannot enter. There will be more opportunities to enter giveaways in the future. If you really love the books, both are available to order online or in your local bookstores.
Together with Sterling Publishing I’ll giveaway one copy of each book to two lucky winners! To enter the giveaway, simply leave a comment below letting me know which one you prefer and which GoT characters you’ll think will die this season. Oh, right – that last part isn’t mandatory!
The giveaway closes on Sunday 30 July 2017 at midnight (UTC) and I’ll announce the two winners shortly after on the blog.
Good luck!
xx
Charlie
Please note: Two winners will be selected at random from all entries entered before midnight on 30 July 2017 and the winner will receive the prize described above. There is no cash alternative, and your prize is non-negotiable, and not refundable. If the prize isn’t claimed, another winner will be selected at random.
Happy Knitting!
♥
facebook/bloglovin/pinterest
twitter/instagram
Stay in touch!
Summer is almost over and I haven’t even shown you any of my summer makes yet! I made a couple cute summer tops this year I’ll share nonetheless, because they’re just too cute not to.
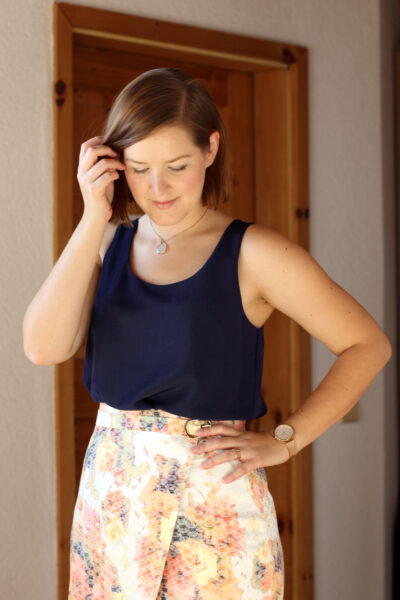
This one is an oldie but goldie! You all probably know the Sew Over It Silk Cami by now. I’m pretty late to join the party – but as I said, better late than never. I always knew this little pattern had massive potential to become a wardrobe staple in many ways, but for some reason it took me a couple of years until I finally bought it. I have no excuses. I probably thought this pattern was too basic to spent money on, but these are actually the patterns you want to invest in! A basic, well-drafted pattern is perfect to first get to fit right and then use as base for endless variations.
The Silk Cami comes together super quick and is perfect to show off really cute prints that don’t work well with garments that have a lot of seams, darts and pleats.
So this top was the right companion for this super cute fabric I have had in my stash for a few years now. I bought it at the first SewBrum Meetup in Lauren’s shop, Guthri & Ghani in Birmingham. It’s 100% cotton and was something around 18£/metre. I normally don’t spend that much money on cottons, but the print was love at first sight. I kept it in my stash for ages, because I was waiting for the right project to come along.
For me, the longer a fabric sits in my stash the less “valuable” it becomes. At first, I hesitate and dare not cut into the more expensive ones, but give it a few years and I will use them for wearable (well, mostly wearable) muslins. I know this makes no sense.
Well, this is why this gorgeous cotton ended up being used for my silk cami muslin. And guess what? It doesn’t fit! Good thing is, it fits my best friend perfectly and she’s more than happy to take it off my hands.
It’s just too tight around the bust and gaping a bit at the back neckline. I adapted the pattern accordingly and the second and third top I made are a great fit. But I have to say goodbye to my bear-behind-a-tent-fabric. Life is tough!
Another great thing about this top – it colour-matches perfectly with my new labels. I’m so, so happy about them that I had to give them some more screen time on the blog. Here we go!
These wonderful labels are courtesy of The Dutch Label Shop who kindly approached me and offered to try out their costum-design labels. I was getting tired of my old ones that I’d been planning to update for a while, anyway.
I picked a sew-on label with very practical end folds – so I could use these as a coat hook for lightweight cardigans, as well. I’m very happy about going back to the sew-on type. I had some iron-on ones made a few years ago by a different brand, that come loose after a few washing circles.
These labels might certainly be quite an investment for some, but the quality really shows compared to other brands.
What I really love about the ones from Dutch Label Shop is that you can upload your own design, costumising fonts and colours as well. This made it possible to incorporate parts of my blog’s design into the labels. Don’t they look fantastic?
I have 200 labels now – I’m probably not anywhere close to having sewn 200 garments over the years – so these will last me a looooong time! I already started to sew these into some of my older handmade garments, just to take off some of the pressure, hehe.
Falling leaves or not, I’ll share some of my other summer makes soon!
Have a great week,
xx
Charlie
Happy sewing!
♥
facebook/bloglovin/pinterest
twitter/instagram
Stay in touch!
Happy New Year, everyone! Hope you all had a great start into the new year. In Germany we say ‘Have a great Rutsch‘, whishing you a lovely skid into the new year… I’m starting 2018 by sharing my Christmas and NYE outfit. I sincerely hope you guys are not too tired of hearing about holiday outfits by now!
Isn’t this a beautiful combination of patterns? Before I get into too much self-praise, let me tell you how this outfit came together.
Last December I was approached by the lovely folks over at Stoffe.de (also known as myfabrics.co.uk) offering to sponsor my holiday outfit. Yup, December and I didn’t already have one. I’m a classic last-minute sewer, so I had neither an outfit nor plans for one (yet).
I wanted to create a festive look that would work both for Christmas and New Years Eve. But how to do formal and casual in one?
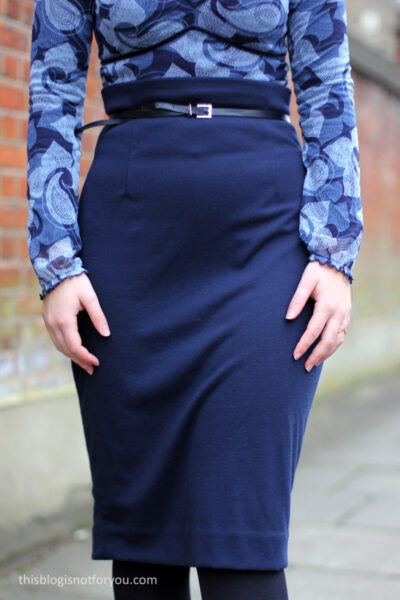
I went for quite festive fabrics, combined with a more minimalist and casual cut. Well, you know I love my pencil skirts for every occasion. They can be worn two ways – top tucked in or left out. It creates two very different looks.
I paired it with a jumper pattern – mostly for comfort (and to have enough room for all the holiday meals). I’ve followed the newly arisen velvet craze and wasn’t too big a fan at first. Velvet can look outdated very, very quickly. But I thought I’d challenge myself a little and use fabrics I hadn’t used before: animal print plus velvet. If this isn’t stepping out of your comfort zone, then I don’t know what is.
Let’s get into all the details, right? Pattern-wise I combined an old love with a new one! My beloved, fitted-to-death Ultimate Pencil Skirt pattern by SEW OVER IT, which I loooove to pieces. I stopped keeping track of how many I made so far. Roughly ten, I guess. I suppose I could sew it in my sleep now. I won’t go into too much detail, as I’ve been gushing over this skirt for years now. Well, it’s a classic and therefore qualifies as perfect base for any two-piece outfit.
Since moving back to Germany, I slowly make my way around German sewing blogs and indie pattern companies. There are so many amazingly talented people out there, it’s unbelievable. I wish I had the time to follow more and try more patterns.
For this project, I tried the wonderful LaLinna jumper pattern by SCHNITTGEFLÜSTER (‘pattern whisperings’), who’s made it her goal to create super minimalist, basic patterns for all sizes. Their patterns range normal to plus size and are available as PDF-Download. They’re also very affordable and easy makes for beginners. As an advanced sewer, I had a lot of fun to use this cut as a foundation to add some fun details. Man, they have just SO many gorgeous patterns to gush over, I bet from now on you’ll never hear the end of it. I see a whole Schnittgeflüster year coming. Brace yourselves, I warned you.
LaLinna is perfect tucked in or casually worn over the skirt. The batwing-sleeves are very comfy, add to a beautiful drape and look quite elegant with narrow cuffs. I changed the neckline to a boat neckline and lengthened the cuffs to make them appear even narrower. The hemline drops down at the back, adding even more volume and creating a gorgeous silhouette. The jumper looks great worn over skinny jeans, too. I wouldn’t mix it with really wide-fitting trousers or A-line skirts, though.
Let’s talk about these fabrics now, shall we? I really went for something I haven’t tried before and picked a crushed stretch velvet in antique silver (HERE‘s the link for you German folks) and a leopard print stretch jacquard in black (which appears to be out of stock, unfortunately!). Both fabrics are courtesy of Stoffe.de (also known to UK folks as myfabrics.co.uk).
Despite having heard many horror stories about sewing with velvet, this wasn’t one of them. The velvet sewed like a breeze and wasn’t sliding around at all. It’s got a very lovely soft texture with an elegant shine.
The leopard jacquard is perfect for sewing close-fitting skirts (or trousers) as it has a nice amount of stretch. I used a stretch lining fabric (link for Stoffe.de) to go with it. The jacquard has a nice sheen and matches the velvet perfectly.
So far so good, I’m VERY happy with this combo. I’ve worn the LaLinna jumper loads since the holidays, mostly with skinny jeans to work and can’t wait to rock that skirt again some time soon.
Did you make something for the holidays? Also, if you have some great pattern recommendations for me to try in 2018, please share!
xx
Charlie
Happy sewing!
♥
facebook/bloglovin/pinterest
twitter/instagram
Stay in touch!
 Hello there! Today we’re talking pattern standoffs!
Do you have sewing cravings? Sometimes I want to sew just for fun, some days I really want to make something that I urgently need in my wardrobe and, well, sometimes I want to take up a masterpiece project. Most of the time the particular craving depends a lot on the time I have on my hands.
Time is actually quite an important factor when choosing a pattern for your next project. There are a hundred ways to sew a skirt. I can be done in half an hour or it might take a couple of days. That’s completely up to you and the pattern you pick.
I thought it would be fun having a look at some unlikely couples. I’ll share two pattern options for sewing projects – one that can be done in an evening and one that will keep you busy for a weekend. Shall we have a look?
Are you looking for the perfect jeans project? If you need a new pair of jeans by tomorrow – Mia to the rescue! The Mia Jeans pattern by Sew Over It (included in the ebook My Capsule Wardrobe) is the perfect ‘very quick & perfect fit’ pattern for you. I have made 4 pairs so far and they all turned out amazing. The pattern comes together really quick, the only two trickier bits being the front fly and the patch pockets in the back. Fitting is made very easy with a generous seam allowance that’s included in the pattern. I really recommend checking out Sew Over It’s Youtube channel for the video on constructing the front fly.
My tip: choose a stretch denim fabric to make fitting even easier!
You finally want to tackle that masterpiece jeans project of yours that’s been on your list for ages? The Ginger Jeans by Closet Case Patterns is a very well designed five-pockets-jeans pattern with a higher back rise, belt loops, rivets and all! The pattern is incredibly popular and known for a flattering fit and a professional look. You’ll need more supplies compared to Mia, but this is a project of love and a masterpiece you will be proud of! In Germany we say it’s for those with “patience and spittle”.
My tip: Make sure you have all the supplies ready by the time your sewing weekend starts, so you can work without frustrating shopping runs. Take your time and enjoy the ride!
There are just soo many great blouse patterns, but these two are my current favourites.
The Silk Cami (Sew Over It) is such a satisfying quick sew. I can’t recommend it enough. It comes together very quick: no fastenings, bias binding or darts! It’s a basic French seamed sleeveless cami top finished at the neckline with a facing. You’ll need very little fabric and very little time! I love to use this pattern for hacks, such as this dress. It probably doesn’t even count as a blouse, as there are no sleeves or anything involved. But this is such an elegant little garment, it is more than just a top.
My tip: Spend some money on a high quality polyester, cotton lawn or silk fabric. You won’t need much fabric, so you can go for quality over quantity.
If you want to take your time and get into more technical handiwork, the Carme Blouse by Pauline Alice Patterns is a great project. It’s a sophisticated-looking, but versatile blouse. It offers a couple of challenges such as pin tucks, a small mao collar, a front yoke, a button placket and sleeve tabs. The instructions are very easy to follow and you’ll also find sewalong videos for this project on Youtube.
My tip: Instead of just following the pattern markings for the pin tucks, take your time and measure – press – sew one by one. I found that measuring the intervals gives a much neater outcome.
The Burdastyle pattern 09/2015 #117A is such a rewarding little project. Not much effort but making a big impact. View B is belted and slightly shorter than View A. The pattern is pretty brilliant as long as you use the right fabric. They’re asking for double-sided wool because it comes without lining. Therefore, it’s a really quick, simple sew. No interfacing, no lining, no bindings. It’s pretty much just three pattern pieces: front, back and back sleeve (plus pockets). The sleeves are two pieces. The front one is cut as a kimono sleeve and part of the front bodice pattern. I got many compliments on this coat and people can’t believe I made it myself. You can check out my version here. No-sweat coat making with this little number!
My tip: Find a show-stopper fabric in a bold colour. Make sure your fabric is double-sided!
The Ellsworth Coat by Christine Haynes is a fully lined classic 1960’s-inspired double breasted overcoat. You can go topstitching galore on this one! There’s a collar, lots of buttons and buttonholes, pockets, lining… basically everything you want and more when your sewing mojo is top-notch and you have the whole weekend in front of you. Add a season of Game of Thrones or Homeland to the mix and you’re good to go!
My Tip: If you’re planning on using a patterned fabric, buy a little extra and take your time before you cut to get the pattern matching right.
Skirts are generally easygoing and quick projects. It depends on pleating, button plackets, zips or pockets how much time you’ll need.
The Ultimate Pencil Skirt by Sew Over It is one of my all-time favourite patterns. It’s very elegant but simple, works also as a mini skirt and can be made in woven or knitted fabrics (I tested this!). The trickiest part of this skirt is at most the concealed side zip. I made a version with a exposed front zip which also worked brilliantly. I’ve made many versions and hacks of this skirt, it’s the perfect base once you got the fit right. I made a faux-wrap hack with belt-and-all. I even based the design of my wedding dress on this pattern! It’s so very versatile, it’s definitely worth buying.
My Tip: Find a fabric with a little stretch and focus on getting a perfect fit. It’s a great base for many future skirt projects.
My very own Hepburn Skirt PDF pattern is another great option for a high-waisted pencil skirt. The vertical and horizontal seam lines are perfect for colour-blocking and give you some options for experimenting with style lines and colours. Cutting, sewing, pressing and finishing seams takes a little bit longer, although the skirt is fairly easy to sew. It’s certainly a project for a confident beginner to tackle.
My Tip: Depending on the type of fabric you choose, you might want to take the time to add a lining, as well. Thus, you prevent the skirt from riding up when you walk.
* * *
Did you find this helpful? Would you like to see more content like this? And what are your evening vs. weekend pattern recommendations? Please don’t be shy and let me know in the comments!
Next time we’ll have a look at blazers, cardigans, trousers and dresses!
xx
Charlie
Happy sewing!

facebook/bloglovin/pinterest
twitter/instagram
Stay in touch!
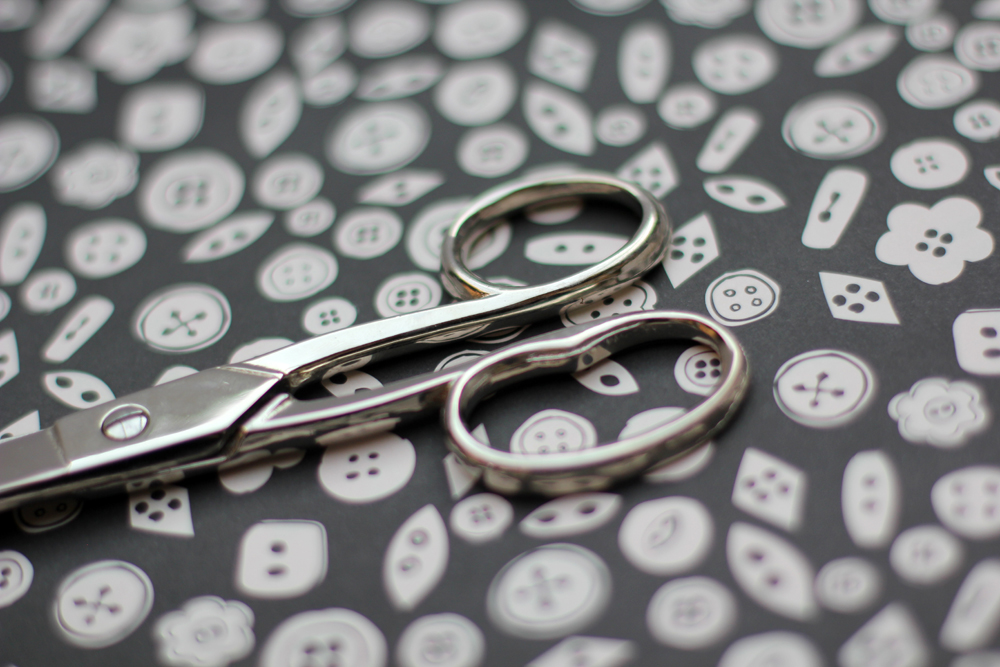
Hello there! Today I want to share a really fun & quick project to personalise or update your t-shirts! This is really easy to do and the perfect project if you feel like a creative project but don’t have a lot of time on your hands. It only took me a couple of minutes plus the time it needs to dry. I love those little projects that you can squeeze in after work.
The lovely folks over at Stencil Revolution offered to send some stencils for me to try. What I love about their company is that it’s a small, family-owned operation that developed out of what originally was a street art forum. I love supporting upcoming creative businesses and I really had a great experience with them. They offer a large variety of designs and sizes (for decorating walls etc), I stuck to smaller sizes as they seemed a better fit for decorating shirts, fabrics and tote bags.
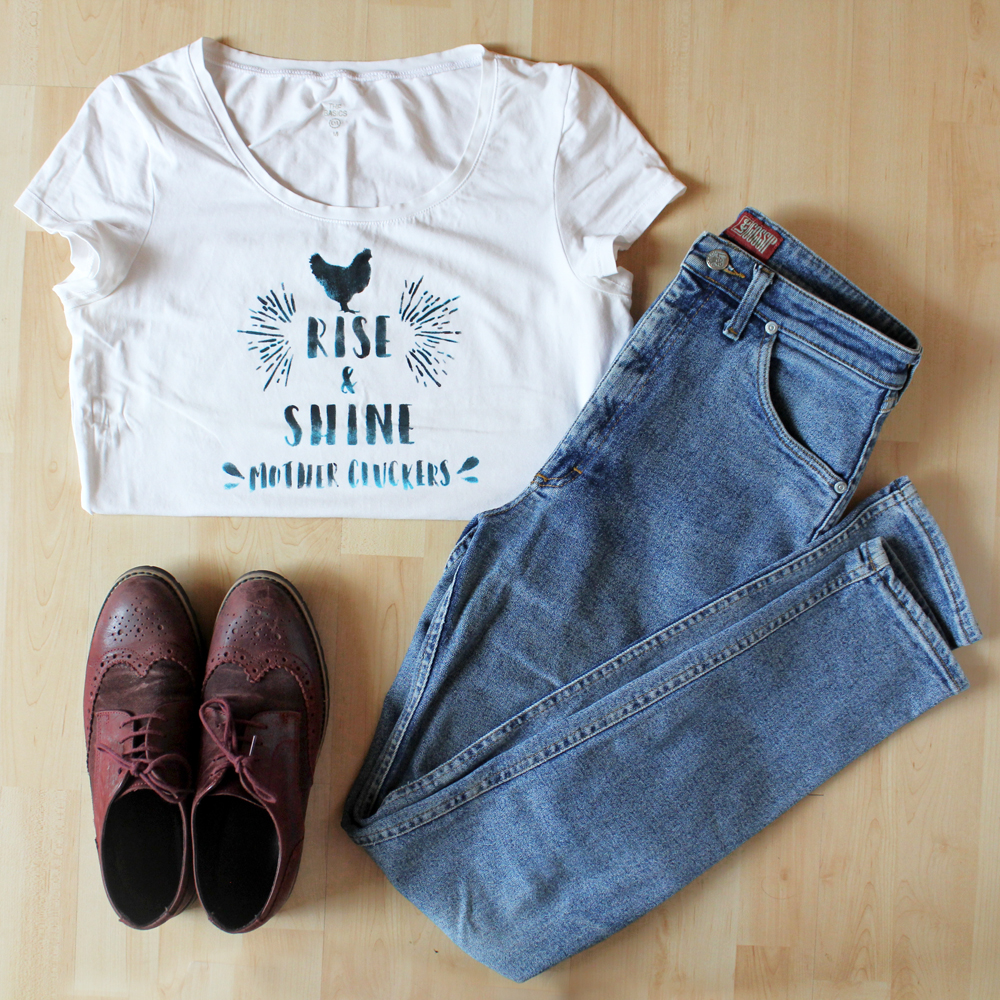
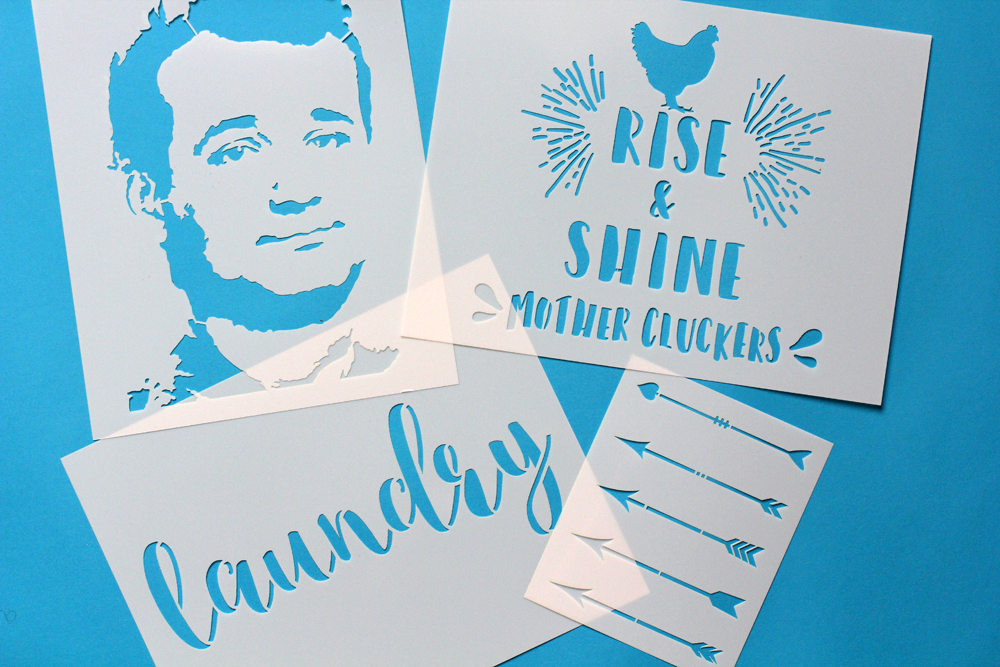
These stencils are not very expensive but are very long lasting. It’s a hard plastic sheet that you can wipe and wash and reuse many times. I had specific project ideas in mind when ordering the three larger stencils. But I picked the arrow stencils knowing this would be a motif I will probably use over and over again! Obviously, you can use these for walls, furniture, bags etc., too. I just love a t-shirt refashion and I buy plain white & black t-shirts every once in a while for exactly these kind of projects.

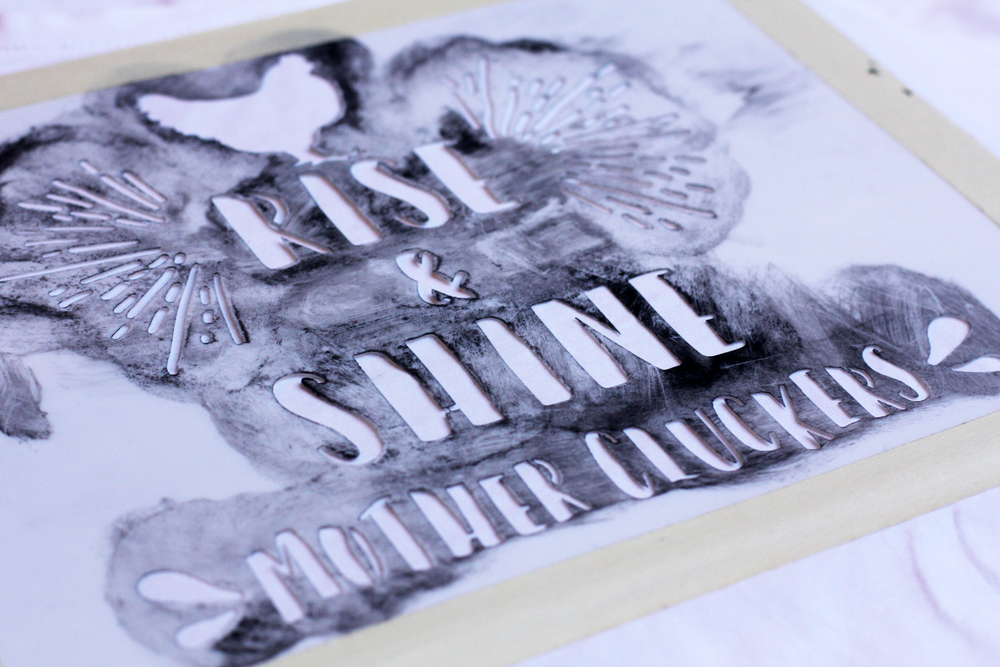
So, how does it work?
First of all, here’s what you need:
– stencil templates
– fabric paint (I used black and light blue/turquoise)
– small dry sponge
– old plate or plastic container to pour the paint in
– masking tape
– a piece of cardboard (big enough to place under the area you are using colour on)
– iron & iron board


I’m planning more projects with these stencils. They would also make a great project to do with kids. That Bill Murray will go on a tote bag for sure!
I’m looking for some nice gold or rose gold textile paint. Do you have any recommendations?
xx
Charlie
Please note: As always, all opinions are my own. All my product reviews are completely honest. I was gifted this product, but not asked to review it or given compensation for doing it.
Happy crafting!

facebook/bloglovin/pinterest
twitter/instagram
Stay in touch!